Saturday, October 1, 2011

My first Craigslist purchase!


 My oldest daughter, "M", recently moved into a house with a couple of her friends, so she needed furniture.  I scoured garage sales, thrift stores and craigslist collecting "goodies" and enjoyed every minute of it.  One thing she needed was a desk for her bedroom.  I had a vision of what I was looking for, which was mainly nothing too bulky.  I looked everywhere!  Then, BAM, I found this beautiful desk on craigslist.  


I made a mad dash to the city the next day to pick it up.  I was a little hesitant about the top of the desk, because it was laminate that looked like wood.  At first, I was concerned about how the paint would adhere to laminate, but remembered I was using Annie Sloan Chalk Paint, so no worries!!


I took off all of the awesome hardware...


and began painting it using Annie Sloan's Louis Blue.


That is the laminated top I was hesitant about.


Here is the desk with one coat of paint.  (I nearly always use two coats of ASCP.)


Two coats!  Ready for distressing.  (Do you see other projects in the background???  I'll be posting about those soon....I've just got to figure out how to reupholster that chair!!!  
See the before pictures of it here.) 


Let the sanding begin!  I sand in areas that the paint would normally get worn off over time, such as corners and legs.  I prefer to do most of my sanding prior to putting on the wax.  However, I know of some people who wax first, then sand.  Do what you like best!  


Then I began distressing it even more with clear and dark wax.


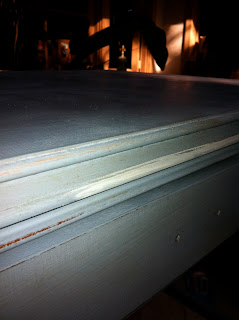
I wanted more for the desk.  So on certain elements on the desk, I brushed on ASCP Old White, using an almost dry brush.  I did not care about being exact either.  Once dry, I used clear and dark wax over the 
Old White.


Here it is all finished!  The coloring in some of the pictures make it look a little purply.  (Is that a word?)  The previous picture is closer to the true color of the desk.  Ohhh, I also took the brass drawer pulls and dry brushed on some ASCP Old White to soften them up too. 


I LOVE the way this desk was transformed, and it was so easy!  Most importantly, "M" loved it too!!  (Really...it's not so purply!  I need a new camera!!)


It's been awhile since I have been able to blog, so it's nice to be back!!! I've been busy being a wife, mom and daughter to my wonderful family.  In my spare time I've been painting furniture and working on a new adventure!  Can't wait until I can share it with you guys!!!
Until next time......


Blessings........
Bizzi B


Friday, September 30, 2011

Welcome to my office!


I found this "beauty" on craigslist.  I bought it because it was sooooo comfy, and it cost me next to nothing!!  I figure one of these days I will get around to reupholstering it, but until then, I will continue to drag it out of my garage, have a seat and update my calendar, to-do list and drink my coffee in the mornings!


Until next time.....


Blessings.....
Bizzi B

Tuesday, September 13, 2011

I've been featured!

O.M.Geeeeeeee!!!! 
Do you remember the table my friend found on the side of the road that I turned into an island in my kitchen?  If not, you can refresh your memory here

Well.......
 Beckie Farrant, creator of  Roadkill Rescue, was kind enough to feature me on her awesome blog. 
Yes, you heard me.....I have been featured on someone elses blog!!! 
You can check it out here
If you are a blogger, you know what a big deal this is for me.


Love, love, LOVE the name!!  Love, even more, the concept of her blog. 
 You need to check out Roadkill Rescue, because you will be amazed at all of the "trash" that people have turned into "treasures"!  Amazing, but most of all.....INSPIRING!


 Blessings....
Bizzi B

Thursday, September 8, 2011

Trash to Treasure Thursday ~~ Take a Seat

This chair was a STEAL!  Well, not really a steal...but a really, really good deal. This blue velvet chair was a remnant from an estate sale.  I inquired as to how much the chair was and he gave me an offer I couldn't refuse.  I loaded it up and we were off!


There are just a few scratches on the wood, but I plan on painting it so scratches won't matter.


The right side of the chair is in mint condition.  The left side.....


Well, let's just say.....ummmm NOT so good!


No brads... No problem!


Not too sure about this hand stitchin' job either!


I can't wait to see how this project turns out!  I'm off to get my hammer, screwdriver, and any other tool I might need.  Until next time!


 Blessings....
Bizzi B  

Tuesday, September 6, 2011

Newbie Party over at Debbiedoo's

I just posted my link over at Debbiedoo's Newbie Party. 

 Check it out here. 


  Blessings...
Bizzi B

Thursday, September 1, 2011

Trash to Treasure Thursday ~~ This Little Light of Mine......

My oldest blessing, "M" and I were thrift store shopping when we ran across this lamp. I knew that with a little bit of paint and some distressing that this thing could be beautiful. 
 Trust me...I swooped it up in a hurry.  
A couple of dollars later we were out the door...Literally! 


 The base of the lamp was in perfect condition.  However, the shade had a few creases in it, 
but I'm saving that for another post. 


Look at this Beauty!  


I mean.....Look at those curves!


I pulled out my Annie Sloan Chalk Paint (ASCP).  This paint is Ahh-mazing!  No primer needed.  No sanding needed.  Dries super-de-duper fast!  It was almost time to pick up "lil b" from school, so I quickly slapped the paint on the entire base.I used the color Duck Egg Blue.  My new favorite color!


You can see that the paint has a little bit of texture to it.  
You can also tell that I "slapped" it on, but that is the look I wanted.


By the time I returned home, the paint was dry so it was time to begin the distressing process.  
It is my favorite part of any project I do!!


I was so excited about the way it was turning out!  
It looked sooo stinkin' good!


The next step is sealing the paint with wax.  I prefer to use Annie Sloan Soft Wax.  I covered the entire piece with clear wax, and then quickly brushed on some dark wax.  
You hardly need any dark wax on your brush.  A little goes a long ways.....trust me!  
Occasionally, I would need to wipe off some of the excess dark wax in order to get the desired look.


From start to finish, the painting, distressing and waxing took me less than 3 hours.  That includes waiting for the paint to dry.  It took about 24 hours for the wax to fully dry or "cure" as I call it.  
Once cured, I took a soft cloth and buffed it all over.  
Oh! My! Gosh!  This lamp turned out to be so much more than I thought it could be!!!


See that cream colored armoire behind the lamp base?  
I will be painting it Duck Egg Blue using Annie Sloan Chalk Paint in the near future.  
No sanding.  No priming.  No problem.  


  Blessings....
Bizzi B

Monday, August 29, 2011

What Could It "B"?

That blue-green base "thingy" that you see sitting on top of the box is what will be featured on my Trash to Treasure Thursday blog. 

Hmmm....I wonder what it could "B"?  


Spool No. 72

Notice the label on the box.  I love Spool No. 72.  They have new merchandise, but I am obsessed with their AWESOME vintage items.  I ordered a bag at midnight on Thursday night, and the postman rang my doorbell on Monday morning with the package...shipped all the way from the state of Washington.  Now that is what I call service!  Until next time!


  Blessings...
Bizzi B

Thursday, August 25, 2011

Trash to Treasure Thursday ~ ~ Island Paradise


This is truly someone else's trash that is now my treasure!  A junkin' friend of mine was driving down the road and found a table in a trash pile on someones curb.  It was literally in pieces!  I gladly brought this bad boy home.  I knew that with a little work, a coat of paint and some distressing, it would be a perfect island in my kitchen.  


The underneath side of the table top.


I forgot to take pictures of the previous base, but it was beyond repair.  Trust me!  So my hubby, Handy-Dandy Rob (HDR), constructed a new table base and attached the legs to it. You can't really tell in this picture, but HDR rigged the legs to the base so that the "island" would be 33" tall.  


Beginning stages of distressing the base.  I used my son's metal baseball bat and began-a-beatin' on the new table base.  We had issues getting the table sturdy, so HDR used extra screws.  This was an okay thing, because the sides of the table will hide them.


Ta-dahhhhh!  
(Please ignore the background junk!)


I love how the layers of paint show through!


Distressing details...


and more...


Love, love, LOVE my "new" kitchen island!


This project is not complete until I get a pretty rug to go underneath the island.  It may take me awhile to find the perfect one, and when I do I will let you know.  Until next time!

Blessings...
Bizzi B